Hello, Bor from the passionate development division here. Welcome to the first English blog post of the Logicalbeat blog.
In this article I will explain FABRIK, one of the more widely used Inverse Kinematics (interchangeable with the shortened “IK”) algorithms and make a simple implementation of it in Unity from scratch. But first, what is inverse kinematics?
目次
1. What is Inverse Kinematics?
In robotics, an arm with multiple points of articulation is modeled as a kinematic chain, a series of bones with joints between them. Every bone has a length and a position relative to the previous bone in the chain. Forward kinematics is used to calculate the position of the end of the kinematic chain, the robot arm, based on a given configuration of the bones.
Inverse kinematics, as the name implies, is the inverse of this. It takes an end position, and computes the most desirable set of joint positions to achieve this position given certain constraints.
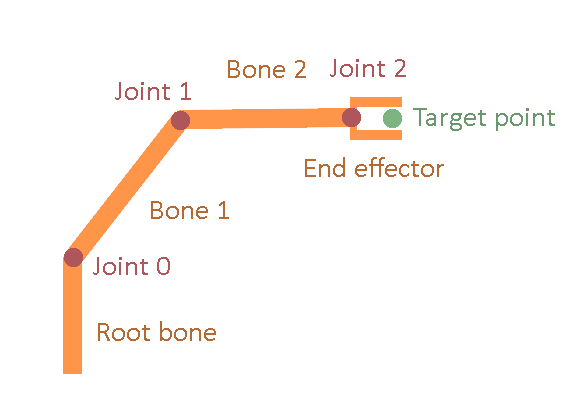
In video games, this technique is used to make characters interact with the environment. In many modern games, characters will adjust their feet and legs properly to the slope of the environment they are standing on, or push their hands against walls as they approach them. This is done with IK. The point where a foot is supposed to stand on the ground is selected as the target for the algorithm, and the configuration of all the bones in the leg is set accordingly.
2. The FABRIK algorithm
As stated before, the FABRIK algorithm has been widely adopted. Originally proposed by Andreas Aristidou and Joan Lasenby in 2011, it has since been implemented as the IK solver used by, among others, Unreal Engine 4 and Unity.
FABRIC stands for Forward And Backward Reaching Inverse Kinematics. An accurate name, as its main steps involve traversing both forwards and backwards over the bones in the chain and adjusting them along the way. It traverses the chain several times, until the desired accuracy is reached. Accuracy is measured simply as the distance between the effector and its target.
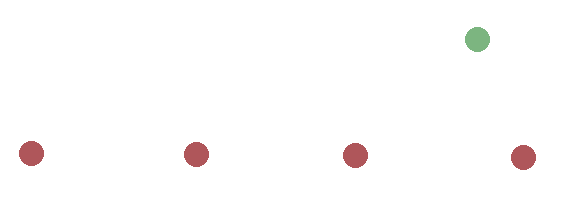
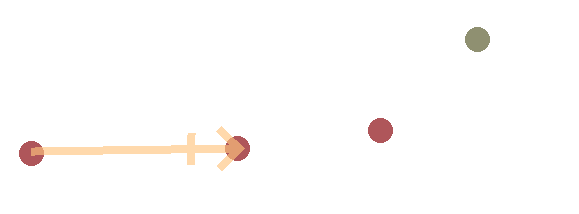
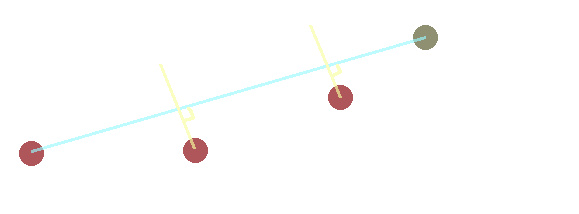
Let’s imagine a 2D case as an example to demonstrate the algorithm. Say the red dots are the bones. The leftmost bone is the root, it is attached to a character and as such can’t move. The rightmost bone is the end effector, it will attempt to reach the target, shown in green.
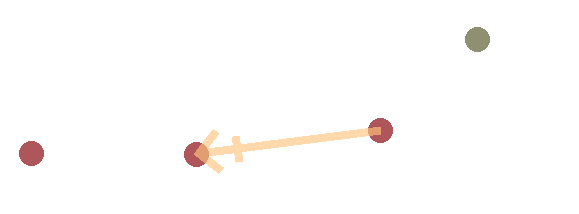
Now, for the first step. Backward propagation. To start with, we simply set the end effector bone to the position of the target.

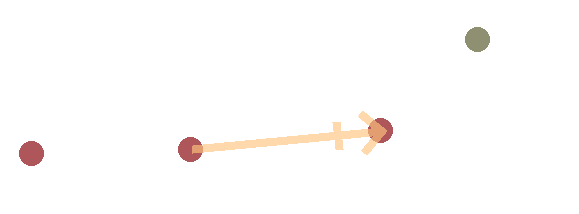
Next, we construct a vector from the new position of the end effector to the next bone in the chain, and we put the next bone at the same distance from the end effector as it was at the start configuration. However, this time, we measure this distance along the previously constructed vector. In the below image this position is marked with a line on the vector’s arrow.

Then, we simply loop over the chain towards the root doing the same step. Make a vector pointing from the previous bone to the current one, place the current bone along that vector while keeping the same distance, and on to the next.
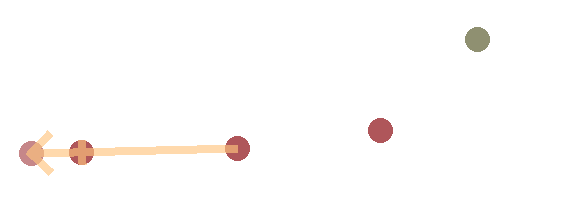
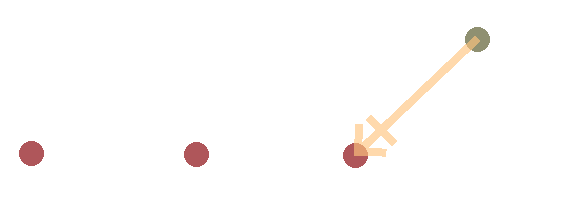
Now we have arrived at the root bone and the backwards step is over. At this last bone, however, we run into a problem. The root bone is defined by its inability to move, and yet we just moved it.
This is where forward propagation comes in. We do essentially the same algorithm, but the other way around. We start by placing the root bone back to its original position, which will require us to move the next bone along its vector with the root bone so that its length is unchanged.
We keep doing this until we reach the end effector, which now no longer reaches its target. Now we’re done with both the forward and backward propagation phases and one iteration of the algorithm has been completed.

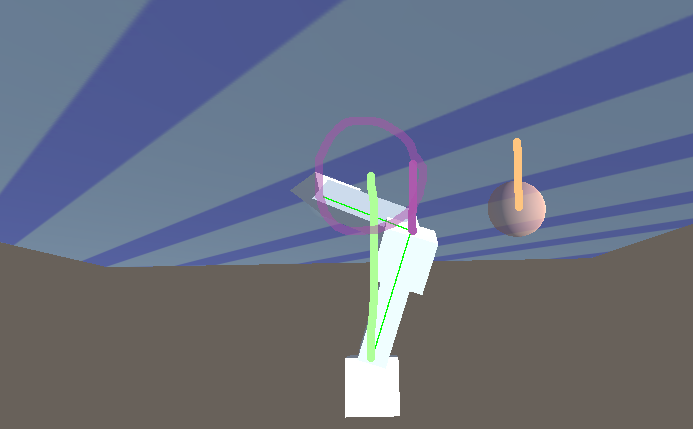
As can be seen in the above image, the end effector has approached its target quite a bit. If we are okay with this position we can leave it as is, but in most cases we would want to run the algorithm multiple times and approach the target a bit more every iteration. After a few more iterations of the same two steps will result in something along the lines of the below image.

In conclusion, FABRIK is a simple and rather intuitive IK solution that uses only very simple linear algebra to achieve its goal, whereas most of its predecessors used more complicated matrix computations which cost more processor time. When implementing it in 3D there are a few more steps necessary, and there are some slight optimizations we can do for trivial cases which will be discussed as they come up in the implementation phase.
3. Implementation phase
I have set up a basic leg model and a target object in Unity. The leg is a hierarchy of meshes, with each bone being a child of the bone it is attached to. The base of the leg is the root of the hierarchy, and the foot is the leaf bone.

Let’s add a script to the leaf bone, the foot. We will add functionality later, but first let’s add a little bit of visualization to make it easier to see what we are doing.
// Number of bones in the arm
[SerializeField]
int ArmLength;
private void OnDrawGizmos()
{
Transform current = this.transform;
for (int i = 0; i < ArmLength && current != null && current.parent != null; i++)
{
Debug.DrawLine(curent.position, current.parent.position, Color.green);
current = current.parent;
}
}This way, we will be able to set the length of the IK chain in the Unity editor and immediately preview this by drawing lines through all the bones in said chain.
Alright, let’s get started on the actual algorithm. First, we need to prepare some of the fields we will need to be able to access. We need to provide the algorithm with a reference to the target object, which we will refer to simply as target.
Next we need an array of references to the transforms of the different bones so that we can manipulate their positions when the algorithm is done.
Lastly, we define arrays that the algorithm will use to iterate on. For the basic version of the algorithm we will start with just a Vector3 array of bone positions, a float array of bone lengths and a single float to save the total length of the arm.
// Number of bones in the arm
    [SerializeField]
    int ArmLength;

    // Target the affector will attempt to move to
    [SerializeField]
    Transform target;

    // List of bones
    Transform[] Bones;

    // List of the position offsets of the bones
    Vector3[] Positions;

    // List of the length of the bones
    float[] BoneLengths;

		// Total length of the bones
    float FullLength;
Now it’s time to initialize our data. We could do this directly in the MonoBehaviour Start function, but we want to be able to reinitialize everything during runtime so it is easier to separate it into its own function that we call from the Start function.
To initialize our arrays we loop over the chain in reverse, from the effector to the root of the arm. Starting at i = Bones.Length – 1 and going up one parent for every loop, we can find the length of each bone by subtracting the position of its child from its own position. If, however, we are at the effector bone we do not save a length as it is defined as being length 0.
// Start is called before the first frame update
    void Start()
    {
        InitializeArm();
    }

private void InitializeArm()
    {
        // Init arrays as arm length + effector
        Bones = new Transform[ArmLength + 1];
        Positions = new Vector3[ArmLength + 1];

        // Last bone is the effector, so it has no length
        BoneLengths = new float[ArmLength];

        FullLength = 0;

        // Init array data
        Transform cur = transform;
        for (int i = Bones.Length - 1; i >= 0; i--)
        {
            // Fill bone array
            Bones[i] = cur;

            if (i == Bones.Length - 1)
            {

            }
            else
            {
                // Set the length of this bone equal to the difference of the position of this and the previous bone
                BoneLengths[i] = (Bones[i + 1].position - cur.position).magnitude;
                // Add current bone's length to the total length of the arm
                FullLength += BoneLengths[i];

            }

            cur = cur.parent;
        }
    }}
Thus we come to the actual implementation of the algorithm. First, the basic setup of the way in which we will do the computation and send the result back to Unity’s game objects.
We will call the ResolveIK function every frame. If less precision is necessary it is of course possible to call it every other frame, or only when CPU usage is low, or based on any other combination of factors.
First we can check if the length of the chain hasn’t changed on the Unity side of things, and reinitialize if it has. This way, we can change the amount of bones in an arm during runtime.
Next, we fill the array of bone positions with the positions of the transforms we saved in the Bones array during initialization, after which we will execute the IK algorithm and then feed the new positions that result from it back into the transforms.
// Update is called once per frame
    void Update()
    {
        ResolveIK();
    }

    private void ResolveIK()
    {
        // Call Init again if the length of the arm has changed.
        if (BoneLengths.Length != ArmLength)
            Init();

        // Get current bone positions for computations
        for (int i = 0; i < Bones.Length; i++)
            Positions[i] = Bones[i].position;

        // TODO: Do IK computation

        // Set transform positions to the computed new positions
        for (int i = 0; i < Positions.Length; i++)
            Bones[i].position = Positions[i];

    }
Next, there is a trivial case for which we won’t need the FABRIK algorithm and can thus save computation time: The case that the target is too far away for the arm to reach. This is why we saved the total arm length during initialization.
The following code is inserted where the TODO is in the above fragment.
We simply check the squared distance with the squared length of the arm, and if the distance exceeds the length we get the vector pointing from the root to the target and distribute the bones along it at their maximum length.
// Can we reach the target?
        float sqrDistanceToTarget = (target.position - Bones[0].position).sqrMagnitude;
        if (sqrDistanceToTarget >= FullLength * FullLength)
        {
            // Get the direction towards the target
            Vector3 dir = (target.position - Positions[0]).normalized;

            // Distribute bones along the direction towards the target
            for (int i = 1; i < Positions.Length; i++)
                Positions[i] = Positions[i - 1] + dir * BoneLengths[i - 1];

        }
We can see that this works when the target is out of range for the arm. However, the bones do not rotate to reflect their new orientation yet. We will tackle this later. For now our green helper line shows that we are moving in the right direction.
However, we do not do anything when the target gets close enough for the arm to reach. Let’s handle this first.
We need some more variables to control the algorithm. First is the int iterations, which is simply the amount of back and forth traversals we will do before quitting. accuracy, meanwhile, is the distance between effector and target that we find acceptable.
// How many times to run the algorithm
    int iterations = 10;

    // How close the affector needs to be to the target for us to stop doing iterations
    float accuracy = 0.001f;
Here is the general flow of the iteration logic. Because we only need to do this if the target is close enough to reach, we can put it in an else clause after the distance check we did earlier.
As you can see, we simply repeat the algorithm iteration number of times, unless the effector gets close enough to trigger the accuracy threshold.
for (int iteration = 0; iteration < iterations; iteration++)
            {
								// TODO: Back Propagation

								// TODO: Front Propagation

                // Stop iterating if we are close enough according to the accuracy value
                float sqdistance = (Positions[Positions.Length - 1] - target.position).sqrMagnitude;
                if (sqdistance < accuracy * accuracy)
                    break;
            }
Let’s tackle back propagation. As described above, we loop over the arm from the effector towards the root bone. The effector is a special case, we simply set it to the target’s position.
Every other bone we set to a position along the vector between itself and the previous bone. We can do this by subtracting the position of the previous bone from the current bone’s position, normalizing this vector and then multiplying that by the length of this bone as saved in the BoneLengths array. This offset is then added to the position of the previous bone.
for (int i = Positions.Length - 1; i > 0; i--)
{
   if (i == Positions.Length - 1)
   {
      // Just set the effector to the target position
      Positions[i] = target.position;
   }
   else
   {
      // Move the current bone to its new position on the line based on its length and the position of the next bone
      Positions[i] = Positions[i + 1] + (Positions[i] - Positions[i + 1]).normalized * BoneLengths[i];
	 }
}
We can implement the forward step in almost the same way, we just need to loop over the chain in the other direction and point the vector the other way. Starting at i = 1 so as to keep the root in position, we get the following loop.
for (int i = 1; i < Positions.Length; i++)
{
      // This time set the current bone's position to the position on the line between itself and the previous bone, taking its length into consideration
      Positions[i] = Positions[i - 1] + (Positions[i] - Positions[i - 1]).normalized * BoneLengths[i - 1];
}
The meshes still don’t rotate, but looking at the green helper line it seems to be working! The base FABRIK algorithm is now working, and from here on out we just fix the rotation and add some extra features.
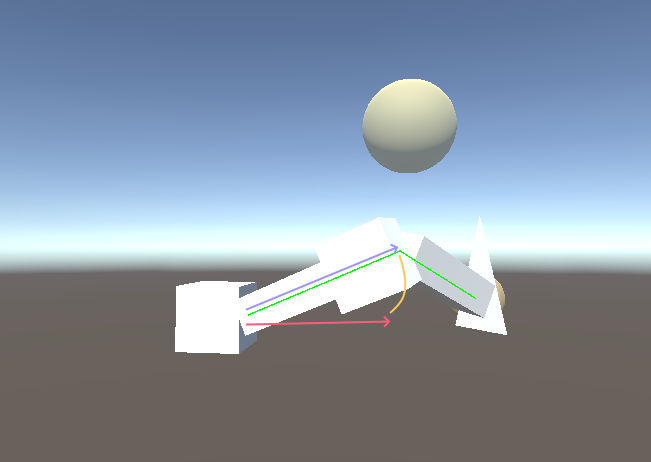
Rotating the bones is really not particularly complicated, but because it involves quaternions and requires us to make slight changes to several parts of our code, let’s take it step by step. Essentially all we need to do is find the difference between the original position of the bone and the new position and rotate it to reflect this. If the original position was at the end of the red arrow, and the new position is the end of the purple arrow, we need to add the yellow rotation to the base rotation of the bone.
Let’s get started. First we need to define some variables at the top of the script that we can use to save the staring configuration of the arm. First is an array of vectors that point from every bone to the next. Next is an array of quaternions that we will use to store the original rotations of every bone. Lastly we save the start rotations of the target so that we can have the effector match it.
// Rotation information
    Vector3[] StartDirections;
    Quaternion[] StartRotations;
    Quaternion TargetStartRotation;
We have to initialize these newly defined variables and fill them with data. We can do this in various parts of the InitializeArm function we wrote previously. Because it might be hard to tell what relates to the rotation specifically I have added comments with NEW at the start to every new line. Essentially we just initialize the necessary arrays to store base rotations and fill them with the starting rotations of all the bones.
private void InitializeArm()
    {
        // Init arrays as arm length + affector
        Bones = new Transform[ArmLength + 1];
        bonePositions = new Vector3[ArmLength + 1];

        // Init rotation information
        StartDirections = new Vector3[ArmLength + 1]; // NEW initialize bone start directions array
        StartRotations = new Quaternion[ArmLength + 1]; // NEW initialize bone start rotations array

        TargetStartRotation = target.rotation; // NEW save target start rotation

        // Last bone is the affector, so it has no length
        BoneLengths = new float[ArmLength];

        FullLength = 0;

        // Init array data
        Transform cur = transform;
        for (int i = Bones.Length - 1; i >= 0; i--)
        {
            // Fill bone array
            Bones[i] = cur;
            StartRotations[i] = cur.rotation; // NEW Store current bone's initial rotation

            if (i == Bones.Length - 1)
            {
                // Affector bone
                StartDirections[i] = target.position - cur.position; // NEW Store the vector from the target position to the effector position
            }
            else
            {
                // Set the length of this bone equal to the difference of the position of this and the previous bone
                BoneLengths[i] = (Bones[i + 1].position - cur.position).magnitude;
                // Add current bone's length to the total length of the arm
                FullLength += BoneLengths[i];

                StartDirections[i] = Bones[i + 1].position - cur.position; // NEW Store the vector pointing from the current bone to its child
            }

            cur = cur.parent;
        }
    }
Then, at the end of the whole IK step, we can loop over all the bones and set their rotations accordingly. First the effector, which we simply rotate such that it aligns with the target.
Next the other bones. We use the Quaternion.FromToRotation function to find the rotational difference between the original direction vector stored in the StartDirections array, and the vector we get by subtracting the current bone’s position from the next bone’s. We apply this rotation to the bone’s start rotation as it was stored in StartRotations to base the rotation in the correct space, and directly set the transform’s rotation to the result.
for (int i = 0; i < bonePositions.Length; i++)
        {
            if (i == bonePositions.Length - 1)
                Bones[i].rotation = target.rotation * Quaternion.Inverse(TargetStartRotation) * StartRotations[i];
            else
                Bones[i].rotation = Quaternion.FromToRotation(StartDirections[i], bonePositions[i + 1] - bonePositions[i]) * StartRotations[i];
        }
It works! We can now move the target anywhere, and the arm will do its best to keep up.
This concludes the implementation of the FABRIK algorithm. However, for this to be useful for modeling actual game characters we would like to have more control over how it bends, rather than simply having it bend in a seemingly random direction. As any target position has a myriad of potential configurations that will reach it, we need some sort of system to control which configuration we use.
4. Control
To make the arm more widely viable for actual use in character animations, we will define a control object that the arm will attempt to bend towards. First, we need a reference to the object. Let’s add this to the top of our script.
// The control object the arm will bend towards
[SerializeField]
Transform control;
Here it gets slightly complicated. Let’s say we have reached the target with the current configuration. This completes the IK algorithm and is a valid configuration, but it is not the only valid one. In fact, if we draw a line between the root and the target, we can mirror the bones through that line and find the other potential bend for this same target position.
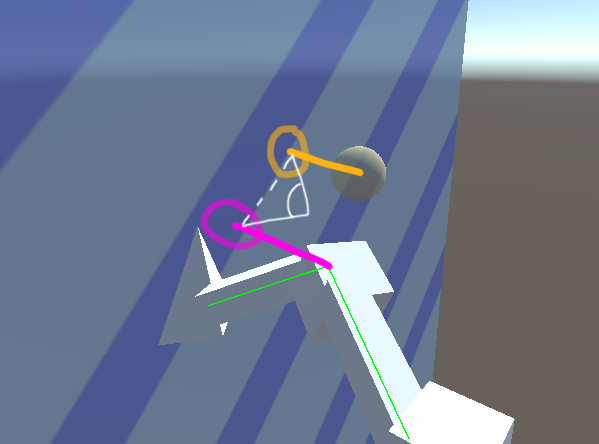
Let’s use the same technique, but in 3D. For every bone that isn’t the root bone or the effector, we define a plane that has the vector between the root and the effector as its normal. In the image above we could describe the potential positions of the middle bones with a line, but in 3D this becomes a plane.
Next, we project both the current bone and the control object onto this plane. Once we have the projected position of both, we can use the handy SignedAngle function Unity has provided us to find the angle at which the bone and control object would be closest. Lastly we apply this angle as a rotation to the position of the bone to move it towards the control object.
This is a bit hard to visualize in 3D, but imagine that the middle joint in the below picture is projected to the plane as shown by the purple line. Without control, it could be in any of the potential configurations shown by the purple circle.
Instead, we find the position where the angle between these two projections is minimized.
Here it is in code. The use of quaternions is not immediately intuitive, as few things with quaternions ever are, but just imagine that we are rotating angleOnPlane amount along the axis defined by the plane’s normal and using this to set the current bone’s position.
// Move bone positions towards control object
        if (control != null)
        {
            // We are only interested in the bones between the first and last one
            for (int i = 1; i < bonePositions.Length - 1; i++)
            {
                Plane projectionPlane = new Plane(bonePositions[i + 1] - bonePositions[i - 1], bonePositions[i - 1]);
                Vector3 projectedBonePosition = projectionPlane.ClosestPointOnPlane(bonePositions[i]);
                Vector3 projectedControl = projectionPlane.ClosestPointOnPlane(control.position);
                float angleOnPlane = Vector3.SignedAngle(projectedBonePosition - bonePositions[i - 1], projectedControl - bonePositions[i - 1], projectionPlane.normal);
                bonePositions[i] = Quaternion.AngleAxis(angleOnPlane, projectionPlane.normal) * (bonePositions[i] - bonePositions[i - 1]) + bonePositions[i - 1];
            }
        }
After that bit of wizardry it now works. We can bend any way we want to. We can make knees, elbows and so on just by varying the position of the control object.
5. Conclusion
We now have a functioning IK driven leg that will always try to match the target object’s position and rotation. This can be used to ground animations in the world by setting the target to the ground elevation and rotating it with the ground’s normal, or even used for procedural animations by moving the target with code to make steps as the parent object moves.
Hopefully this article was easy to follow along with and was helpful in forming an understanding of inverse kinematics, both how it can be used and how it is implemented.
【Disclaimer】
Logicalbeat does not claim any responsibility for damages caused by the use of this website.

